At a glance
Expert's Rating
Pros
- Wi-Fi bridge enables remote access
- Most of your existing deadbolt remains in place, meaning no change to your door’s exterior aesthetic–or your keys
- Keypad means you don’t always need to have your phone
- Works with Google Home, Amazon Alexa, and Philips Hue, and Samsung SmartThings
Cons
- Installation required more steps than the typical full-replacement smart deadbolt
- Bluetooth-to-Wi-Fi bridge has limited Bluetooth range
- Keypad must be screwed to the door or an adjacent wall
- We encountered bugs with lock calibration and firmware update
Our Verdict
Extra hardware to set up and a slightly buggy calibration experience left us less than impressed with this retrofit lock. If your smart lock upgrade must be a retrofit that leaves your exterior hardware unchanged, this one works well enough–once it’s up and running.
Price When Reviewed
$179.99 ($129.99 without keypad)
Best Prices Today: Yale Approach Lock with Wi-Fi + Keypad
Retailer Price Yale $179.99 View Deal
$199.98 View Deal Price comparison from over 24,000 stores worldwide Product Price Price comparison from Backmarket
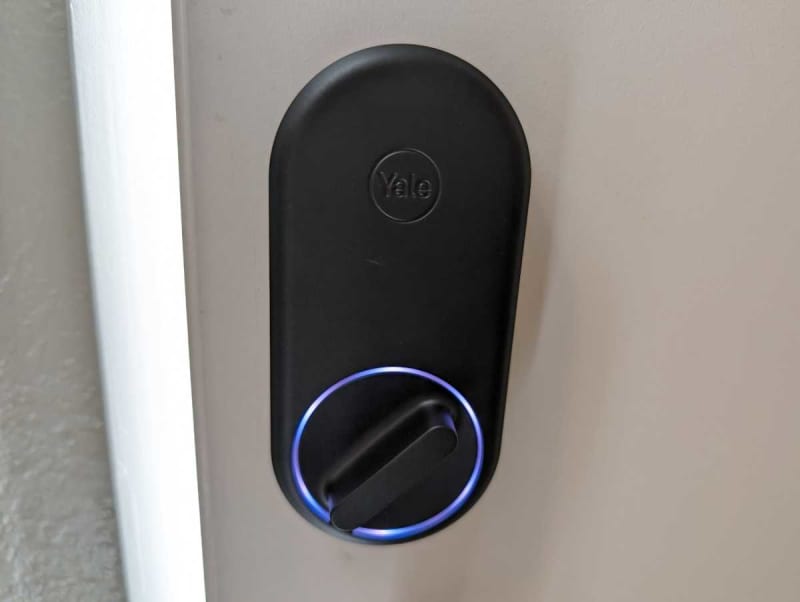
Smart locks can be an unattractive option for people who don’t want to change their exterior door hardware. If you’ve carefully selected a matched lock and handleset to enhance the look of your home, you probably don’t want to replace the deadbolt with a big electronic keypad. The Yale Approach Lock with Wi-Fi + Keypad works with your existing deadbolt, replacing only its interior escutcheon. On the exterior side of your door, the hardware will look after it’s been rendered smart.
In addition to not changing your door’s exterior aesthetic and retaining your existing physical keys for entry–features that make landlords more comfortable with the upgrade–retrofit locks like this one are supposed to be easier to install than a full-replacement. But in my experience, installing the Yale Approach Lock with Wi-Fi + Keypad was no easier—and in a few ways, more of a hassle—than just replacing the entire deadbolt, as I did in my Yale Assure Lock 2 Key-Free Touchscreen with Bluetooth review last March.
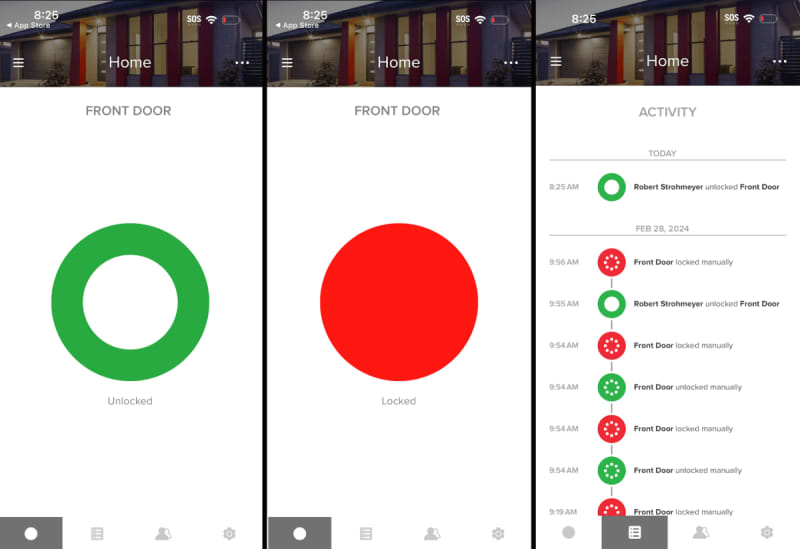
Yale’s activity logs are comprehensive, letting you know who locked or unlocked the door with either the app or an access code, as well as when it was locked or unlocked via the manual latch.
While the Yale Approach works with most single-cylinder deadbolts, I encountered a setback when I dismantled the interior side of a relatively new Kwikset deadbolt on the door where I intended to test this lock: the Kwikset has a double-tail design, so that the single, centered tailpiece socket on the Approach wouldn’t align with the tailpiece coming from the Kwikset’s exterior escutcheon. This is an unusual design, and I doubt most consumers will encounter it, but it serves as a caution to check your existing deadbolt before you buy a retrofit lock for it. In my case, I simply used a different door for this review.
Foundry / Robert Strohmeyer
Installation
The Yale Approach Lock with Wi-Fi + Keypad has more components than a typical replacement smart lock, so I found it takes more steps to install it. When you replace an entire lock, you simply:
- Remove all the old hardware and store it in a bag, in case you want to re-use later or somewhere else.
- Insert the new latch.
- Mount the exterior escutcheon and attach it to the interior mounting bracket.
- Thread the power cord through the door and connect it to the socket on the interior escutcheon.
- Connect the interior escutcheon to the bracket and tighten up all the screws.
- Run the software setup in the app.
That’s pretty much exactly the process I followed with the Yale Assure Lock 2 and with almost every other smart lock I’ve ever installed, which turns out to be a weirdly high number in retrospect.
This review is part of TechHive’s in-depth coverage of the best smart locks.
Foundry / Robert Strohmeyer
Setting up the Yale Approach with Wi-Fi Bridge + Keypad requires a lot more steps:
- Use the included blue tape to hold the exterior deadbolt hardware in place while you remove the interior escutcheon.
- Mount the smart lock’s mounting plate by screwing it through the existing bolt latch and into the exterior hardware.
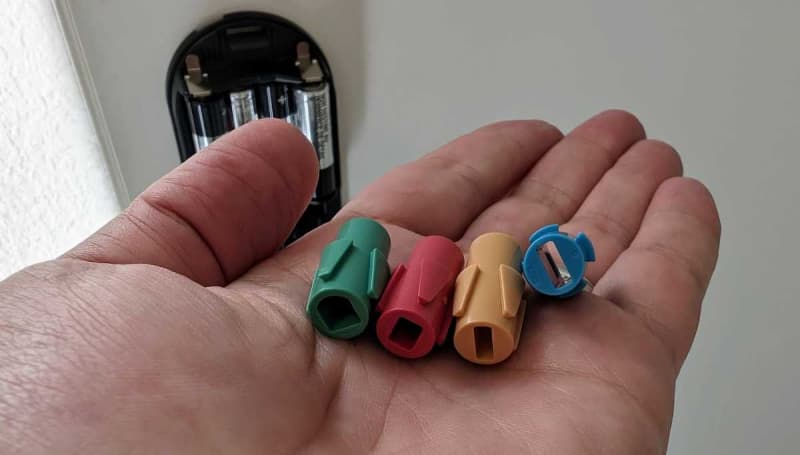
- Select and install the correct shape of tailpiece adapter from the four provided options.
- Snap the interior smart lock body onto its mounting plate (being sure to remove the tape from the battery compartment so power will flow).
- Run the software setup in the app.
- Plug in the Wi-Fi bridge into an outlet within 30 feet of the lock, so the two can communicate via Bluetooth.
- Run the Wi-Fi bridge software setup in the app.
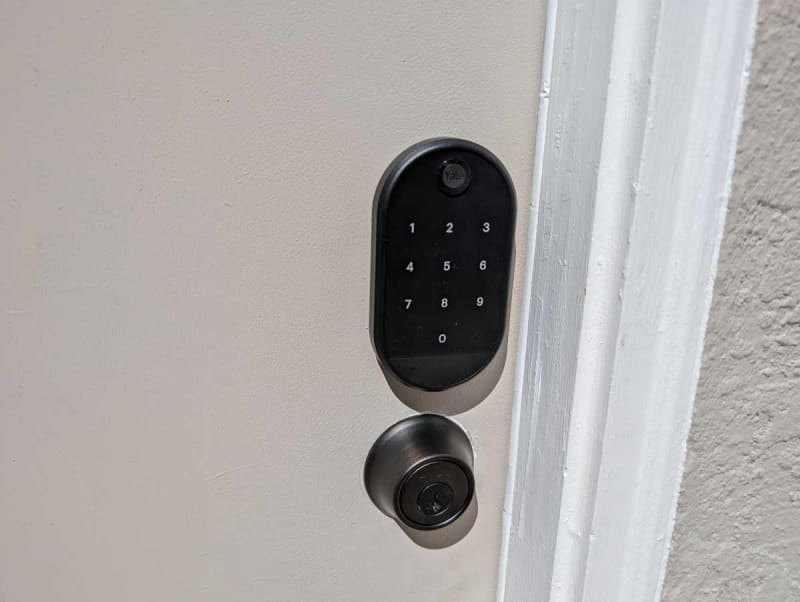
- Screw the keypad’s mounting plate into the door or into a nearby wall (also within 30 feet of the lock, for Bluetooth connectivity).
- Snap the keypad onto the mounting plate.
- Run the keypad software setup in the app.
Foundry / Robert Strohmeyer
None of these steps are particularly difficult, but it’s basically twice as much work as just installing a replacement smart lock with simpler connectivity options. Plus, you’ll take up an extra power outlet for the Wi-Fi bridge, and you’ll still need to put that keypad somewhere on the outside of the house nearby. All in, I’m not convinced this extra effort is worthwhile, let alone that it accomplishes the goal of respecting the sanctity of your existing door hardware. If your spouse or landlord don’t want you replacing the existing deadbolt, they’ll probably also be nonplussed by the addition of a separate keypad screwed into the wall or exterior of the door. Assuming all of this makes sense for your particular situation, however, the installation experience isn’t so bad.
The snag I encountered while calibrating the lock, however, is more problematic: I had to repeat this step enough times that I initially thought my lock might be defective. During calibration, the app prompts you to set the lock to the locked position, then to the unlocked position, and then has you tap the on-screen button to lock and unlock the door.
My unit seemed to keep trying to turn the lock even after it had been turned all the way to the locked position, so the motor kept grinding away for a long time until the lights on the lock turned off and the motor eventually stopped. At that point, the lock would not respond to the app for a while, so I canceled the calibration process, only to receive a message that the calibration completed successfully–which it obviously had not. I tried this process several times with the door closed and a few more with the door open, and eventually it calibrated for real. The lock also required two tries to successfully update its firmware.
Foundry / Robert Strohmeyer
Using the Yale Approach Lock
Once installed and working, the Yale Approach is as straightforward to use as the Yale Assure and other smart locks I’ve evaluated, such as the Schlage Encode Plus Smart Wi-Fi Deadbolt. And unlike the touchscreen keypad on the Yale Assure lock, which is difficult to read in full sunlight, the keypad that comes with the Approach is clearly printed with white numbers that are very easy to read. Not everyone in my family likes to use the keypad, so we welcomed the option of using key everyone already has.
Robert Strohmeyer/TechHive
The Yale Access app is simple and intuitive, with a big, obvious green or red onscreen button to tell you whether the lock is locked (red) or unlocked (green). Tapping the big button reverses the state of the lock. Yale’s activity logs are fairly comprehensive, letting you know who locked or unlocked the door with either an app or an access code, as well as when the lock was manually locked or unlocked. This is a great feature for parents of teens or anyone else who wants to keep track of people coming and going. Install the included DoorSense module, and Yale’s app will also be able to detect whether the door is open or closed, time-stamping those events in its log. Installing this module requires making a couple of new holes in your door and door jamb, which a landlord is likely to frown on, but it’s a very useful accessory if you intend to keep a Yale lock for the long term.
The Approach works with Google Home and Amazon Alexa, as well as Philips Hue and Samsung SmartThings, so you don’t need to use the Yale Access app day-to-day if you don’t want to (although you do need it on on your smartphone for these integrations to work). I’ve been using another Yale device for a while now, and have found myself alternating between Google Home and the Yale Access app in daily use. The Yale Access app is more intuitively designed than the Google Home app, and I’m generally dissatisfied enough with the way Google keeps screwing with the Home and Nest user experience that I don’t mind going straight to Yale’s app to lock and unlock my door. Honestly, I just use the keypad most of the time, because it’s an unnecessary hassle to pull my phone out of my pocket to open the front door.
Should you buy the Yale Approach Lock with Wi-Fi + Keypad?
All things considered, if you’re not in a situation where you need to keep the exterior of your entry door unchanged–i.e., you’re not a renter, or you don’t have distinctive hardware that you want to keep–I struggle to understand the value of the retrofit concept. Screwing a keypad on the door or on a nearby wall it is going to spoil that aesthetic anyway. If you agree, Yale will sell you a version of this same lock without the keypad for $50 less ($129.99 at Amazon). That option is a lot more compelling to me, and the lower price makes it a great entry-level smart lock for renters who might not be able to install it anyway.
I’m very willing to believe the issues I experienced with firmware updates and calibration were anomalies or will be addressed in software updates, but this was the clumsiest smart lock installation experience I’ve in a long time, so I have to rate this lock accordingly; as in, I can’t recommend it today. If you need a retrofit smart lock, TechHive recommends the pricier Level Bolt (or the Level Bolt Connect if you want Wi-Fi connectivity).